Home Page
The EthicsPoint Incident Management Home page uses compact at-a-glance views called Widgets to enhance your understanding of cases and assignments. You can customize your Home page by arranging widgets to view specific information.
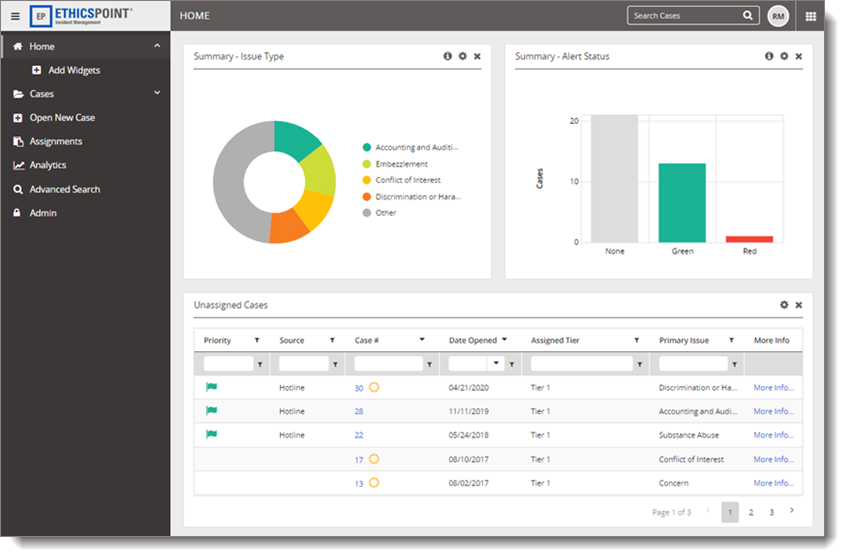
You can add or remove widgets from the dashboard, rearrange the placement of the widgets on the dashboard, modify the columns in the display grid for the widget, and if desired, you can export the case or assignment data to an Excel format.
Add a widget
-
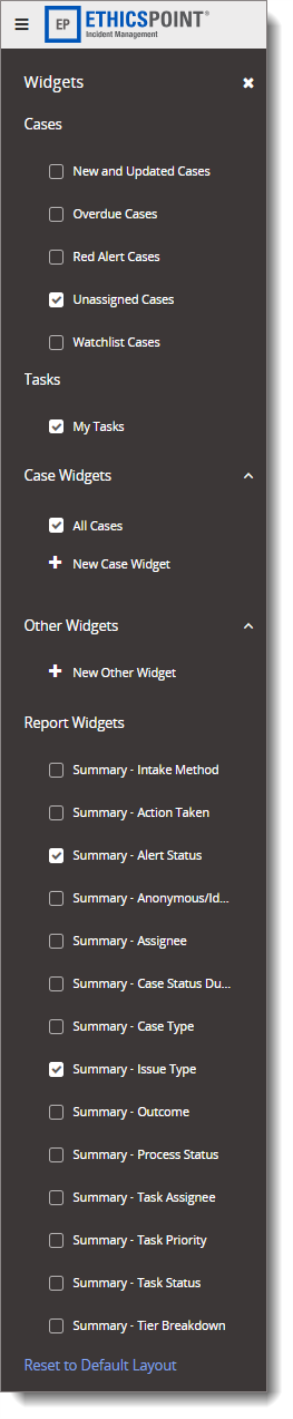
In the navigation menu, click Home, and then select Add Widgets.
-
In the Widgets pane, select any of the check boxes to move the widget to the dashboard. Default widgets that automatically appear on the dashboard are New and Updated Cases, Unassigned Cases, My Tasks, Summary - Alert Status, and Summary - Issue Type.
Note: For Analytics users, preformatted report widgets will be available to add to your dashboard. If you have saved any preformatted reports in Analytics, those reports will also be available to display.
-
(Optional) At anytime, you can reset the Home page back to the default by selecting Reset to Default Layout.
-
When finished, in the Widget pane, click
 .
.
Add additional widgets
You can add additional widgets to your Home page that are associated with case assignments.
-
In the navigation menu, click Home, and then select Add Widgets.
-
Click New Case Widget or New Other Widget, type a name, and then click Save.
Note: Widget names cannot be duplicate or exceed 50 characters.
Remove a widget
You can remove a widget from the Home page by clearing the check box next to the name of the widget in the Widget pane, or by selecting ![]() in the upper-right of the widget.
in the upper-right of the widget.
Rearrange widgets
You can move widgets around the home page to customize your dashboard. To move a widget, simply click in the header bar and drag and drop it to a new location.
Change widget settings
-
In the upper-right grid of the widget that you wish to change, select
 , and then do any of the following:
-
To add a column to the grid, select Show/Hide Columns, and then select a column name from the list or type a column name in the Field name box. To remove a column, clear the column name check box, and then click Close to save changes.
-
To download a complete list of the available columns for searching, click the Export All Fields link.
Note: Up to 20 columns can be selected to be viewed at one time. Selection is disabled once that maximum is met.
-
-
To change the name of a Case Assignment Widget, select Rename Widget, and then click Rename to save changes.
-
After applying filters or any customizations to a widget, you can reset the widget back to the default by selecting Reset to Default.
-
To adjust the number of rows you see per page in the grid, select Reports Per Page, and then choose the desired number of rows to display.
-
To clear the grid and mark the cases shown as viewed, select Mark ALL as Viewed. This action cannot be undone.
-
To export the information in the widget to an Excel format, select Export to Excel. A file saves to your Downloads folder.
Note: The export will only include the first 200 records. Consider adjusting filters if you wish to have a smaller data set.
-
To display a full screen Summary of a Report Widget in which you can edit filters and save the report data, select View/edit Full Report.
-
To delete a widget from the Widget pane, select Delete Widget, and then click Delete.
-
-
When finished, in the Widget pane, click
.
Expand the widget view
You can expand the view of a Case Widget or a Other Widget.
-
On the dashboard, next to the name of the widget, select
 to see the details in a full screen view.
 -
Click
 to return.
Reset to default layout
After applying filters or any customizations to a widget, you can reset it back to the default.
-
In the navigation menu, click Home, and then select Add Widgets.
-
Scroll to the bottom of the menu, and then click Reset to Default Layout.
-
Click Reset to confirm. The action cannot be undone.
Copyright © 2024 NAVEX Global, Inc. NAVEX Global® is a registered trademark/service mark of NAVEX Global, Inc. The NAVEX Global® logo is a trademark/service mark of NAVEX Global, Inc. Unauthorized use of NAVEX Global, Inc.’s trademarks/service marks is strictly prohibited without prior written permission from NAVEX Global, Inc.