Provisioning a New User
Important: New user profiles are created in the Admin Settings of NAVEX One. See Adding a User for more information.
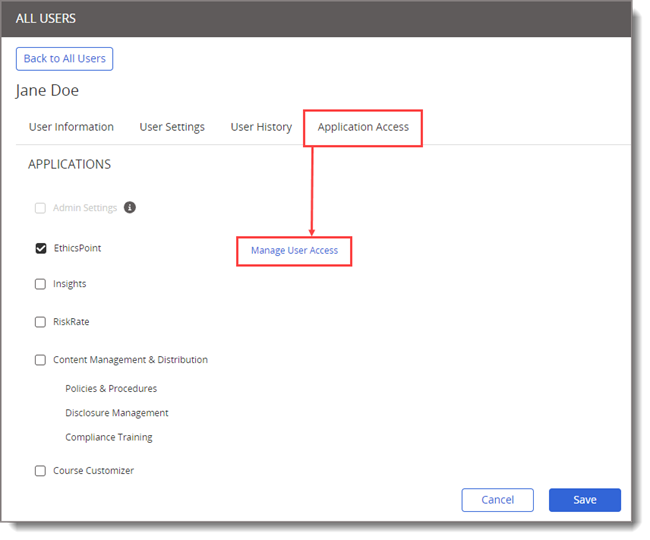
Once a new user profile has been created within the NAVEX One Platform and they have been given EthicsPoint access, the user can further be provisioned in EPIM.
-
From NAVEX One, on the Application Access tab, select Manage User Access.
-
In the User Details tab, fill in the necessary Access information.
- If this is a primary user, select Dedicated User. This assigns a dedicated seat license to the user, which guarantees the user has access to the system regardless of how many other users sign in.
Note: The Dedicated User check box may not be available when adding a new user if all the Dedicated seats have already been assigned.
- If all dedicated seats have already been assigned, the seat license will default to a concurrent license. That is, the new user will share a license with other existing users.
| Access | Description |
|---|---|
| Synopsis Fields |
This is an optional field which allows the user to view and edit Synopsis fields. This allows for the Synopsis features to be hidden on a per user basis. This field may not appear unless specifically requested by an administrator. |
| Principal Data Privacy User |
Allows the user access to the Data Privacy Management tools. This field may not appear unless your organization has a Data privacy module. |
| Premium Analytics | Allows the user to access the Premium Analytics tab on the Analytics tab. |
| Web Services |
Indicates that this user is a web services user only (not selectable, but you can set the user name and password for this user). This field may not appear unless your organization has Web Services enabled. |
| External API |
Indicates that this user is an External API user only (not selectable, but you can set the user's profile and tier access). This field may not appear unless your organization has External REST- based API enabled. Important: This feature can only be enabled for a single user. |
- Set whether you want this user to receive notifications or not. Selecting the Do not notify check box stops configurable notifications for this user.
- (Optional) Type any notes as needed.
- Click Save.
Giving Users Tier Access
Important: A user must be provided tier access to log in to EPIM. If no tier access is provided, the user will receive an error when attempting to log in.
- Select the Tier Access tab.
- Select the check box for each tier the user should have access to.
- Select an access level from the list for each selected tier. This defines how a user can access and manage cases.
Note: Use the Apply to all function when assigning the same access level for multiple tiers. See Access Levels for more information about access level permissions.
- (Optional) Select Tier Admin to make this user a tier administrator in a tier.
- Click Save.
Adding Automatic Case Assignments
- Select the Automatic Case Assignment tab.
- If more than one tier is available, select a tier.
- Select the Assign check box for the issue that you want to assign to this user.
- (Optional) If you want the assigned user to be designated as a Primary Assignee, select the Primary check box.
- (Optional) If you want the user to receive an email message when they are assigned non-hotline cases with this issue, select the Notify check box.
- Click Save
Copyright © 2025 NAVEX Global, Inc. NAVEX Global® is a registered trademark/service mark of NAVEX Global, Inc. The NAVEX Global® logo is a trademark/service mark of NAVEX Global, Inc. Unauthorized use of NAVEX Global, Inc.’s trademarks/service marks is strictly prohibited without prior written permission from NAVEX Global, Inc.