Business Rules
Note: This feature is available to Enterprise level subscription users.
Business rules are created by linking specific conditions to actions that occur automatically when conditions are met. In Third-Party Screening & Monitoring, users can configure their own business rules to automate various steps in the third party approval process — moving third parties from onboarding to either approval or termination.
Business rules can be set using the following conditions and actions:
| Conditions |
|
| Actions |
|
Note the following regarding business rules:
- Any number of business rules may be created.
- Whenever a business rule is executed, a system generated note will be added to the third party’s profile to describe what happened.
- If a business rule is configured to assign a task to the third party’s Approver and the third party does not have an assigned Approver, the task will be assigned to the third party’s Owner instead.
- If your organization has defined a business rule that automatically requests a screening for a new third party, check the profile before a manual request in order to avoid duplicate screenings.
- If a third party or business sponsor interview questionnaire can be triggered as part of a business rule, please ensure contact information is added to the third party's profile.
Create a Business Rule
To create a Business Rule:
-
From the Admin menu, click Business Rules. The Business Rules page displays any business rules that have been created.
-
Click + Create New Business Rule to open the Business Rules Wizard. Then, set conditions, actions, and confirm your selections:
 Step 1: Select and Define Condition
- Select the condition (“New Third Party”, “Initial Profile Risk”, "Unreviewed Screening Report", or “Report Score”).
-
Define the details of the selected condition:
-
If “New Third Party” is selected:
- Select a Third Party Type.
-
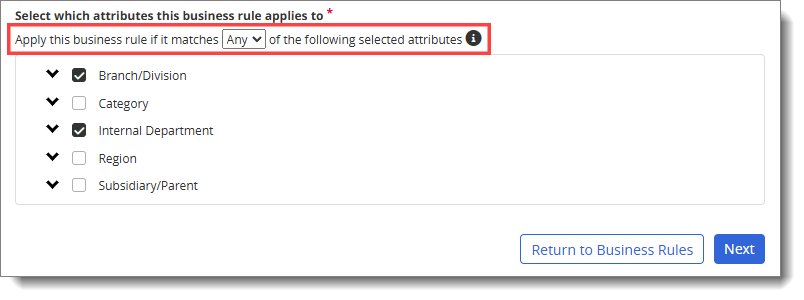
Choose whether the rule will apply to all third parties or only those with certain attributes.
Important: Not all third party attributes are active for all customers. Your selection of attributes is based on what is active and has been set up in your application's configuration.
For each selected attribute, a checked box indicates all available attribute options have been selected. Click
 to expand the list and individually select attribute options.
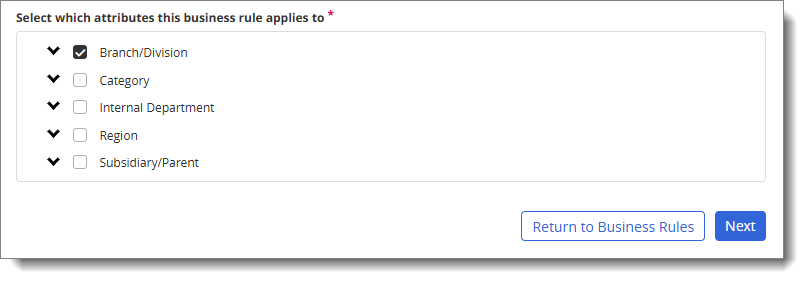
If you select more than one attribute, you will also be prompted to choose whether the rule will apply to third parties that match Any or All of your selected attributes. See Logic Options below for a detailed explanation of the two options.
-
If “Initial Profile Risk Score” is selected:
- Select a Third Party Type.
- Select a Profile Risk.
- Choose whether the rule will apply to all third parties or only those with certain attributes.
-
If “Report Score” is selected:
- Select a Third Party Type.
- Select a Report Definition.
- Select a Report Score.
- Select a Profile Risk.
-
Choose whether the rule will apply to all third parties or only those with certain attributes.
-
If “Unreviewed Screening Report” is selected:
- Select a Third Party Type.
- Select a Report Definition.
- Select a Report Score.
- Select a Profile Risk.
- Choose whether the rule will apply to all third parties or only those with certain attributes.
-
- Click Next.
Logic Options
To help explain the difference between Any or All when selecting multiple attributes, imagine that the following third parties exist in your system:
Name
Category
Region
Country
Third Party 1
Business Services
Americas
United States
Third Party 2
Business Services
Asia
Japan
Third Party 3
IT Services
Asia
Korea
Third Party 4
Travel Services
Europe
Germany
If you select Any (applying OR logic) and the criteria options you selected are the Business Services category and the Asia region, then any third parties that are either categorized as Business Services or are located in Asia meet your selected criteria: Third Party 1 (Business Services category), Third Party 2 (Business Services category and Asia region), and Third Party 3 (Asia region).
If you keep the same selections and change the logic option to All (applying AND logic), then only third parties that are categorized as Business Services and are located in Asia are applicable. In this case, only Third Party 2 meets your selected criteria.
For multiple selections within an attribute, third parties matching Any of your selections apply. For example, if your logic option is All and you select the Business Services category and both the Americas and Asia regions, then both Third Party 1 and Third Party 2 match your selections.
Step 2: Select Actions
- Select the Click here to add an action link.
- Select an Action (“Add Task Assignment”, “Modify Approval Status”, or “Request Screening”).
- Based on the selected Action, provide the additional information by selecting a Task Template, Approval Status, or Report.
- Click Add.
- (Optional) add another action by repeating steps 1 – 4.
- Once all the desired actions are added, click Next. An Action Confirmation window displays to show the action(s) that will be executed.
- Click Continue.
Step 3: Confirm Business Rule
- Review the details of the business rule.
- (Optional) click the slider to Active to activate the rule. By default, new business rules are Inactive.
- Click Save Business Rule.
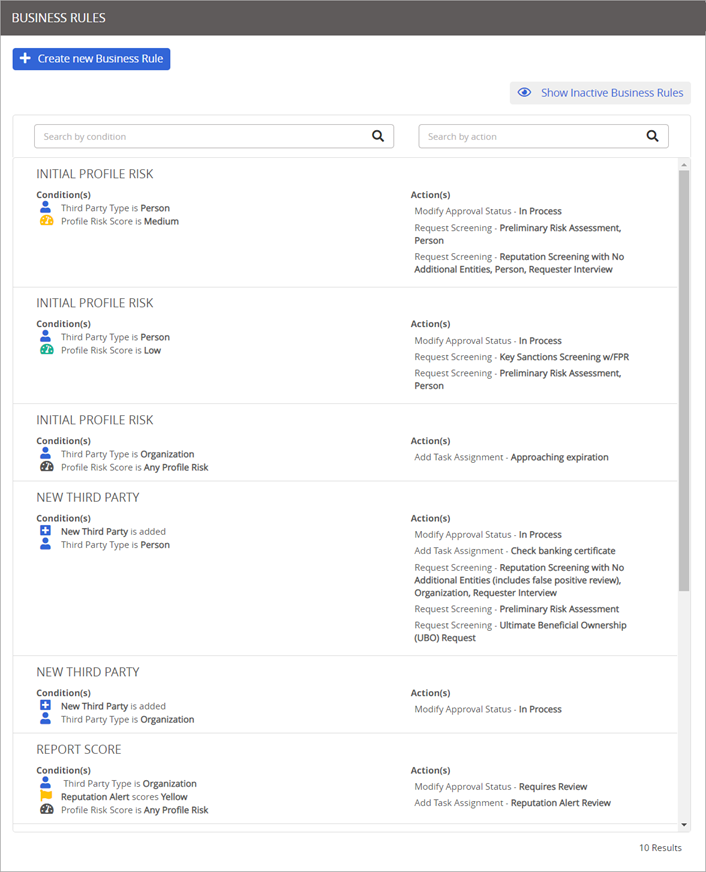
Manage Existing Business Rules
After creating a business rule, you can locate it in the list of results on the Business Rules page and modify its details, change its status, or delete it.
-
From the Admin menu, click Business Rules.
-
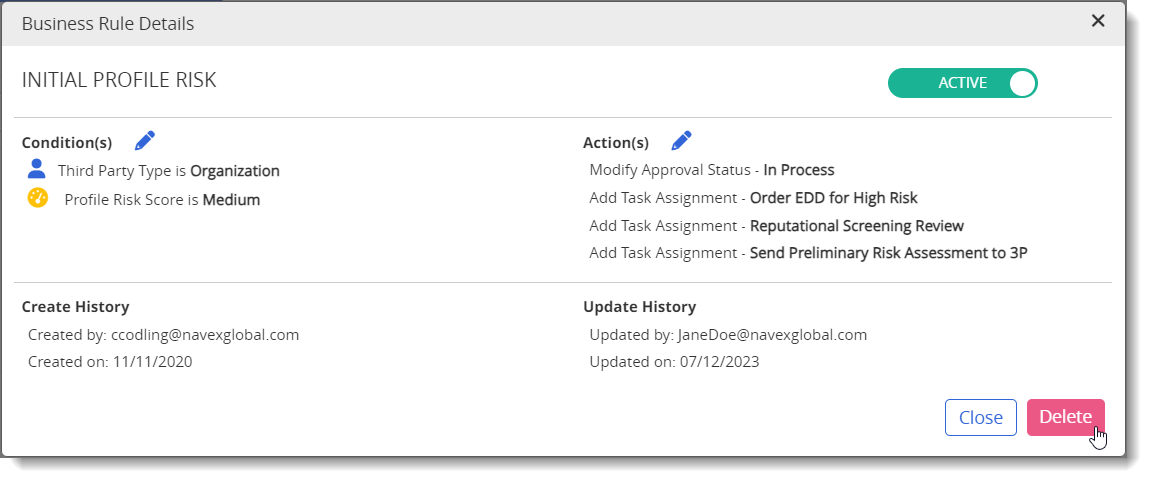
Select a business rule to display its Business Rule Details window. Then, do one of the following:
Modify Conditions and Actions
-
For Conditions, click the edit (
 ) icon, which redirects to “Step 1: SELECT AND DEFINE CONDITION” in the wizard. Then, modify the details as desired and click Save.
 -
For Actions, click the edit (
) icon, which redirects to “Step 2: SELECT ACTION(S)” in the wizard. Click the remove ( ) icon to remove any of the existing Actions, or select Click here to add an action to add one or more actions. Then, click Save.
Activate or Deactivate a Business Rule
Tip: By default, the Business Rules page shows only Active business rules. Select Show Inactive Business Rules on the Business Rules page to display inactive rules.
Select the toggle to set the business rule's status to Active or Inactive.
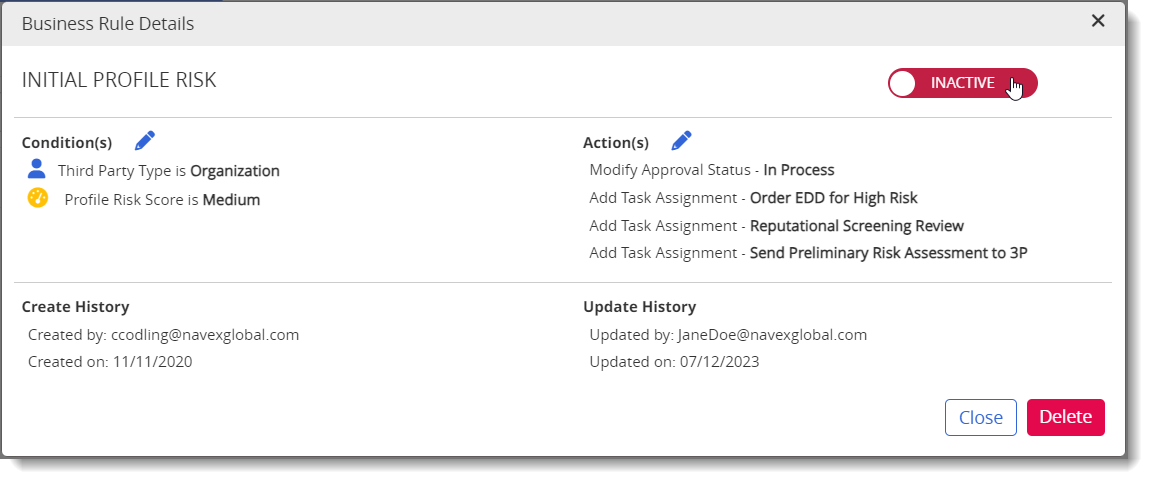 Delete a Business Rule
Click Delete to delete the selected business rule.
-
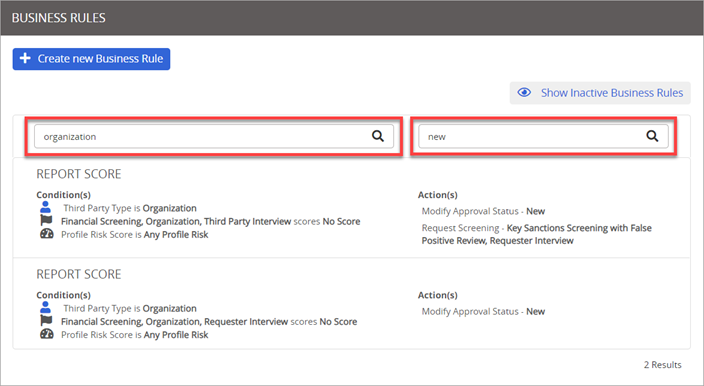
Search Business Rules
For organizations with numerous business rules, the list can be narrowed by searching for a specific condition and/or action. After entering text, the business rules list automatically filters by the search criteria. The number of search results is displayed at the bottom right of the screen.
Note: The search criteria is not case-sensitive.
-
Use the Search by condition text box on the left to narrow the list by condition criteria such as Third Party Type, Reputation Alert, Preliminary Risk Assessment, and so forth.
-
Use the Search by action text box on the right to narrow the list by action criteria such as Modify Approval Status, Request Screening, Add Task Assignment, and so forth.
-
You can also search using both condition and action criteria, as pictured in the example below:
Copyright © 2026 NAVEX Global, Inc. NAVEX Global® is a registered trademark/service mark of NAVEX Global, Inc. The NAVEX Global® logo is a trademark/service mark of NAVEX Global, Inc. Unauthorized use of NAVEX Global, Inc.’s trademarks/service marks is strictly prohibited without prior written permission from NAVEX Global, Inc.