Batch Upload Template Instructions
Important: This feature is available to Level 1 users only.
These instructions include an overview of the batch upload template, an explanation of how the third party ID affects a batch upload, and descriptions of the batch upload template fields, and instructions on how to update existing third parties via batch upload.
Download the Batch Upload Template
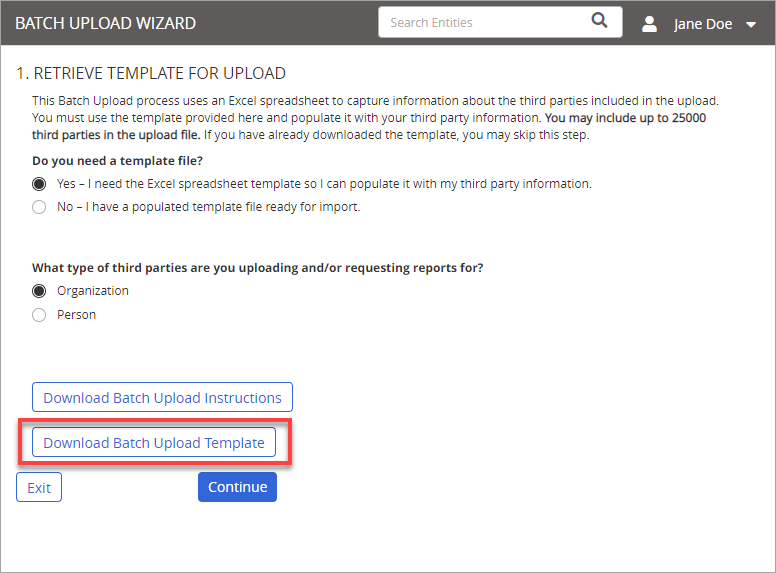
- From the Admin menu, click Batch Upload. The Batch Upload page displays.
- From the header, click
 and then click Batch upload Third Parties.
Important: Be sure to select the Third Party template, and not the Additional Entity template.
- Under Do you need a template file?, do one of the following:
- Click Yes, and then click Organization or Person. Click Download Batch Upload Template to start the download. Follow the prompts to open the downloaded template.
- If you need to upload third parties that are organizations and third parties that are persons, you'll need to perform separate uploads for each third party type.
- Because our data partner stores the screening information for organizations and persons in two separate databases, it is important that you use the correct upload template to upload third party information. In addition, if a person is also registered as a DBA (doing business as), LLC, or incorporated entity, you should upload (or manually create) that entity both as a person and as an organization so that both screenings can be done.
- If you downloaded a batch upload template previously and want to use that template to add or update third parties, click No.
|
Notes: |
Template Types: Organization and Person
There are two batch upload templates—one for third parties that are Organizations and one for third parties who are Persons.
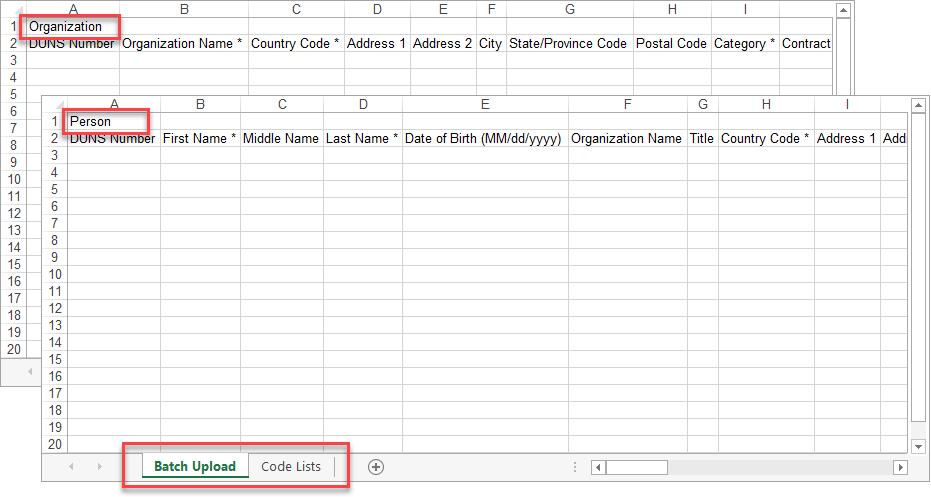
Each template is an Excel workbook containing two worksheets. The Batch Upload worksheet is for entering third party information. Third-Party Screening & Monitoring uses this worksheet to add third parties or update information for existing third parties when you perform a batch upload. The Code Lists worksheet (second tab) contains lists of the codes you must use to identify third parties' countries, states and provinces, categories, and languages. This worksheet is for reference and does not actually get processed during a batch upload.
Important: Do not modify or rearrange any of the predefined content in the first two rows of the Batch Upload worksheet.
Importance of Including Third Party IDs
Third party IDs are unique identifiers used by the batch upload process to ensure that information in a batch upload file is applied to the correct third party and that duplicate third parties are not created. The application uses the following logic when processing a batch upload file.
Creation of New Third Parties
- If a batch upload record (row) includes a third party ID that matches the ID of an existing third party, the application does not create a new third party.
- If a batch upload record includes a third party ID and there is no existing third party in the system with that ID, a new third party is created using the information in the uploaded third party record.
- If a batch upload record does not include a third party ID, the application always creates a new third party. This could result in duplicate third parties, because Third-Party Screening & Monitoring does not check any other third party fields besides Third Party ID for matching data.
Updating of Existing Third Parties
In addition to adding third parties, you can use Batch Upload to update information about existing third parties, but only if all of the following are true:
- The batch upload file includes a third party ID for each third party you want to update.
- One or more of a record's fields in the batch upload file contains information that is different than that in the corresponding fields in the existing third party record in Third-Party Screening & Monitoring.
- When setting up a batch upload, you choose the option for updating existing third parties.
Organization Template Fields
Important: In addition to the standard required and optional fields listed below, any currently active third party attributes (fields listed in the Additional Information area of the third party details page) are also included in the template. Some third party attribute fields may be required. (If you only need to add Additional Information values for existing third parties, see Adding Additional Information to Existing Third Parties below.) Note that Enterprise customers may have additional custom attribute fields defined.
Required
| Required Field | Description |
|---|---|
| Organization Name | Use Latin-based characters only. For example, Chinese, Arabic, and Cyrillic characters are not allowed. (If you need to remove the Latin-based character restriction, contact NAVEX Customer Support.) |
| Country Code | See the Code Lists worksheet in the batch upload template for a list of valid two-character country codes. |
| State/Province Code | This field is required only if you enter US (United States) or CA (Canada) in the Country Code field. See the Code Lists worksheet in the batch upload template for a list of valid two-character state and province codes. Leave this field blank for all other countries. |
| Owner Email | As when creating a third party manually, you must designate a Third-Party Screening & Monitoring user as an uploaded third party's owner by providing that user's email address. Be sure to provide the same email address as the one currently in the user's profile in the application. If you designate a Level 2 user with restricted third party access, that user must have access to the third party to which you are assigning ownership. |
| Approver Email * |
You can designate an approver for this third party by including a Third-Party Screening & Monitoring user's email address. Be sure to provide the same email address as the one currently in the user's profile in the application. If you designate a Level 2 user with restricted third party access, that user must have access to the third party. |
|
|
|
|
|
|
|
|
|
| Contact Language Code ** | See the Code Lists worksheet in the batch upload template for a list of valid Language Codes. |
| Business Sponsor Email * |
Email address of the Business Sponsor. This field is only available if your organization has the Business Sponsor Support feature enabled. Additionally, it can be configured to be required or optional. |
** The following fields are required only if batch upload requests third party interviews. Contact NAVEX Customer Support by submitting a request in the Community to enable this option for your organization.
* This field may be required or optional, as it is not required by default. Contact NAVEX Customer Support by submitting a request in the Community if you wish to have your organization set this up as a required field.
Optional
| Optional Field | Description |
|---|---|
| DUNS Number | This is a proprietary identifier used by Dun & Bradstreet. |
| Address Fields | In addition to the required Country Code and State/Province Code fields, use the Address 1, Address 2, City, and Postal Code fields to include the third party's complete address. |
| Category | See the Code Lists worksheet in the batch upload template for a list of valid three-character category codes. |
| Contact Fields | Use the contact fields to add this third party organization's primary contact information, including name, title, phone number, email address, and physical address. You can also use the Contact Language Code field to specify the language in which invitation emails will be sent to the contact. See the Code Lists worksheet in the batch upload template for a list of valid language codes. |
| Third Party Id |
While this field is optional, we highly recommend including a unique third party identifier. See Importance of Including Third Party IDs for details. |
| Business Registration Number | Unique number assigned to this third party by a government authority for the purpose of identification. |
| ID Number | Unique number assigned to this third party by your organization or by a government authority for the purpose of identification. |
| Tax ID | Unique number assigned to this third party by a government authority for the purpose of identification. |
| Billed To | Captures business unit(s) for billing purposes, so customers can designate which of their internal business units should be billed for Third-Party Screening & Monitoring activity. This field is not enabled by default. Contact NAVEX Customer Support if you wish to enable this field. |
| Status | Indicates whether third party is Active or Inactive, which are the acceptable field values for this column. Can be used to activate or inactivate third parties. Blank values are also allowed. A blank value for a new third party defaults its status to Active, and a blank value for an existing third party retains its current status. |
Person Template Fields
Important: In addition to the standard required and optional fields listed below, any currently active third party attributes (fields listed in the Additional Information area of the third party details page) are also included in the template. Some third party attribute fields may be required. (If you only need to add Additional Information values for existing third parties, see Adding Additional Information to Existing Third Parties below.) Note that Enterprise customers may have additional custom attribute fields defined.
Required
| Required Field | Description |
|---|---|
| First Name and Last Name | Use Latin-based characters only. For example, Chinese, Arabic, and Cyrillic characters are not allowed. (If you need to remove the Latin-based character restriction, contact NAVEX Customer Support.) |
| Date of Birth * | The date of birth of the third party person. It must be in the following format: MM/dd/yyyy. For legacy data, the month and date will default to July 1st. |
| Country Code | See the Code Lists worksheet in the batch upload template for a list of valid two-character country codes. |
| State/Province Code | This field is required only if you enter US (United States) or CA (Canada) in the Country Code field. See the Code Lists worksheet in the batch upload template for a list of valid two-character state and province codes. Leave this field blank for all other countries. |
| Owner Email | As when creating a third party manually, you must designate a Third-Party Screening & Monitoring user as an uploaded third party's owner by providing that user's email address. Be sure to provide the same email address as the one currently in the user's profile in the application. If you designate a Level 2 user with restricted third party access, that user must have access to the third party to which you are assigning ownership. |
| Approver Email * |
You can designate an approver for this third party by including a Third-Party Screening & Monitoring user's email address. Be sure to provide the same email address as the one currently in the user's profile in the application. If you designate a Level 2 user with restricted third party access, that user must have access to the third party. |
|
|
|
|
|
|
|
|
|
| Contact Language Code ** | See the Code Lists worksheet in the batch upload template for a list of valid Language Codes |
| Business Sponsor Email * |
Email address of the Business Sponsor. Email address of the Business Sponsor. This field is only available if your organization has the Business Sponsor Support feature enabled. Additionally, it can be configured to be required or optional. |
* The following fields are required only if batch upload requests third party interviews. Contact NAVEX Customer Support by submitting a request in the Community to enable this option for your organization.
* This field may be required or optional, depending on how your organization is configured. It is not required by default. Contact NAVEX Customer Support by submitting a request in the Community if you wish to have this be a required field.
Optional
| Optional Field | Description |
|---|---|
| DUNS Number | This is a proprietary identifier used by Dun & Bradstreet. |
| Middle Name | Use Latin-based characters only. |
| Organization Name | Use Latin-based characters only. |
| Title | Provide the third party's title. |
| Address Fields | In addition to the required Country Code and State/Province Code fields, use the Address 1, Address 2, City, and Postal Code fields to include the third party's complete address. |
| Category | See the Code Lists worksheet in the batch upload template for a list of valid three-character category codes. |
| Third Party Id | While this field is optional, we highly recommend including a unique third party identifier. See Importance of Providing Third Party IDs for details. |
| Third Party Email | Provide the third party's email address. |
| Language Code | Specify the language in which invitation emails will be sent to this third party. See the Code Lists worksheet in the batch upload template for a list of valid language codes. |
| Phone | Provide the third party's phone number. |
| Business Registration Number | Unique number assigned to this third party by a government authority for the purpose of identification. |
| ID Number | Unique number assigned to this third party by your organization or by a government authority for the purpose of identification. |
| Tax ID | Unique number assigned to this third party by a government authority for the purpose of identification. |
| Billed To | Captures business unit(s) for billing purposes, so customers can designate which of their internal business units should be billed for Third-Party Screening & Monitoring activity .This field is not enabled by default. Contact NAVEX Customer Support if you wish to enable this field. |
| Status | Indicates whether third party is Active or Inactive, which are the acceptable field values for this column. Can be used to activate or inactivate third parties. Blank values are also allowed. A blank value for a new third party defaults its status to Active, and a blank value for an existing third party retains its current status. |
Add or Update Information to Existing Third Parties
If you only need to add or update values to existing third parties (such as when enabling the Profile Risk feature after third parties have already been added), you can expedite the process by exporting existing third party information from the Third Parties list and then copying and pasting that information into the batch upload template.
- From the navigation menu, click Third Parties.
- Click
 and then Show/Hide Columns.
 - Make sure that the Third Party Type column is selected and that at least all the columns that are required in the batch upload template are selected (see "Required" under Organization Template Fields and Personal Template Fields above), and then click Close.
- In the filter box of the Third Party Type column, start typing "organization" if you are preparing a batch upload of organization third parties, or start typing "person" if you are preparing a batch upload of person third parties.
- Click again, and then click Export to Excel and follow the prompts to open the file in Excel.
- In a separate Excel window, open the batch upload template.
- To simplify the copying of third party information from the export file to the batch upload template, rearrange the columns in the export file so that they exactly match the order of the template columns. Also, delete any columns from the export file (such as Third Party Type) that don't exist in the template.
- Once the column layouts of the two spreadsheets match, copy the third party information from the export file and paste it into the template.
- Add information to the Additional Information columns (see Add a Third Party for a list of all possible Additional Information fields).
- Follow the instructions in Perform a Batch Upload of Third Parties to upload the modified third parties.
Copyright © 2026 NAVEX Global, Inc. NAVEX Global® is a registered trademark/service mark of NAVEX Global, Inc. The NAVEX Global® logo is a trademark/service mark of NAVEX Global, Inc. Unauthorized use of NAVEX Global, Inc.’s trademarks/service marks is strictly prohibited without prior written permission from NAVEX Global, Inc.